Normal
Stuff
00. If you kill yourself, it is not my fault. :-)
01.
Place tire blocks in front of the front wheels.(Or behind if on a
decline.)
02. Jack up both rear wheels and place car on jack stands.
03.
Remove both of the rear wheels.
04. Disengage parking/emergency brake.
05.
Place car in neutral.
Halfshaft Removal
Well,
here is what we are going to remove....
06. Place a jack under the Leaf Spring on the side
you are working on.
07. Jack leaf spring up approximately 3
inches.
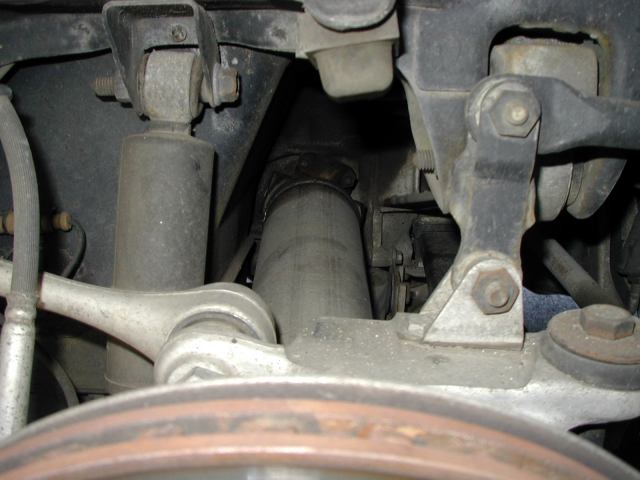
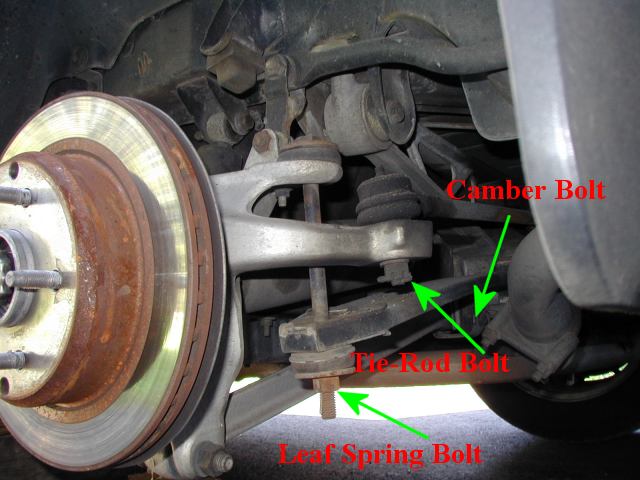
For reference, here are the 3 main pieces that are required to be
removed in order to pull the halfshaft.
08. Remove cotter pin from leave spring nut.
09.
Remove cotter pin from tie-rod nut.
10. Remove leaf spring nut.
First count the number of threads showing before
removal and note it, then you can install it to the correct ride height again.
You need a long socket on the bottom, and closed wrench on the top. Use WD-40
liberally.
11. Remove leaf spring bolt.
Use WD-40 liberally.
12.
Remove tie-rod nut. Use WD-40
liberally.
13. Seperate tie-rod from knuckle with a
suspension fork. Be careful not to split open the
rubber fitting.
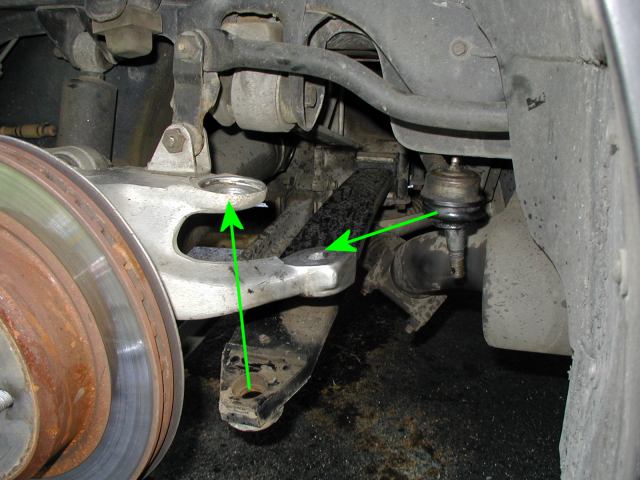
Progress so far.
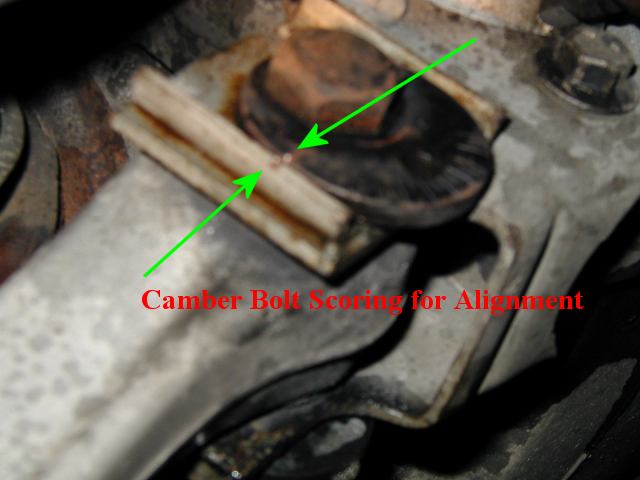
14. Mark camber bolt for realignement after
reinstallation.
It is tough to see, but you need to scribe a line from
the bracket to the wheel on the camber bolt. When you reinstall this later you
have to line them up in order to maintain your car's alignment.
15. Remove camber bolt. Use
WD-40 liberally.
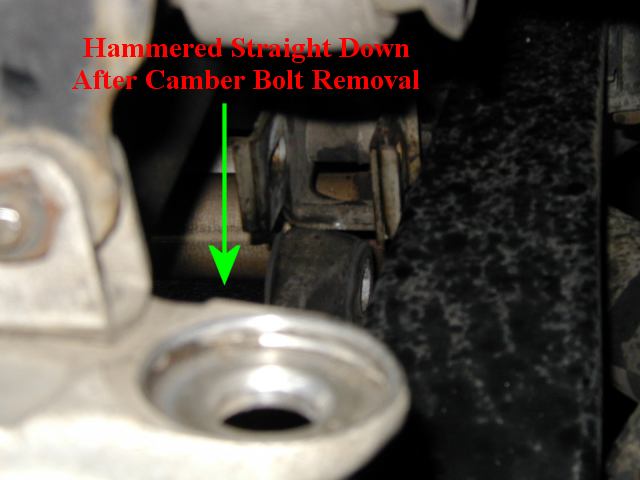
16. Gently hammer strut rod down and
out of its bracket.
Just knock it down out of it's bracket. Be careful
not to lose the two washers that will fall out with it on each side of the
bushing.
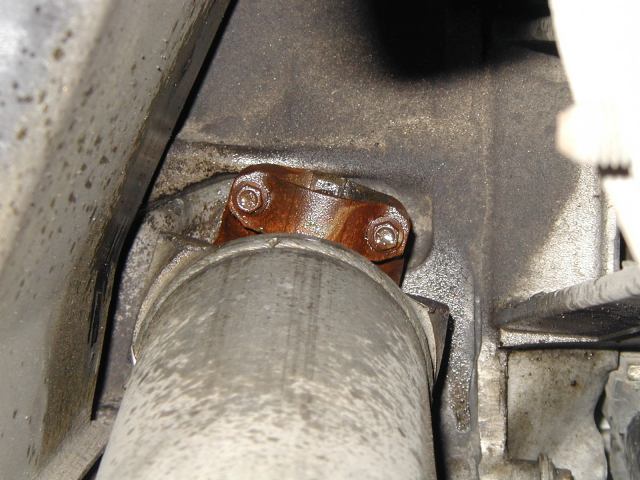
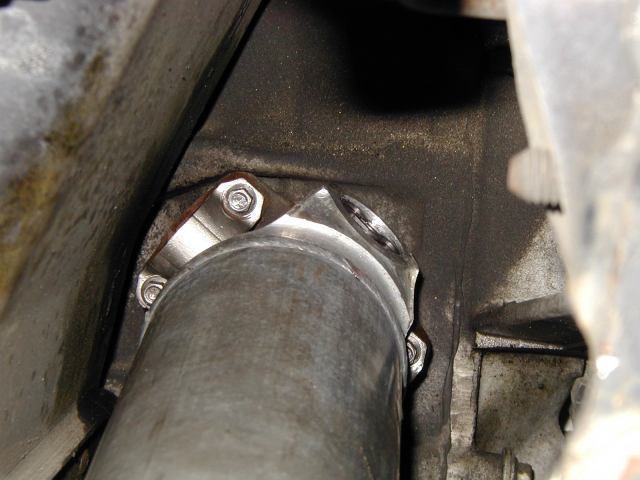
17. Rotate assembly so that two of the 5/16" strap
bolts are accessible on the top of the halfshaft on the differential
end.
You should be able to see them like this. There is lots of WD-40 on
them right now that I sprayed on right after taking the wheels off.
18. Remove two 5/16" strap bolts from differential
side of halfshaft. Use WD-40
liberally.
19. Rotate assembly 180 degrees.
20.
Remove the last two 5/16" strap bolts. Use WD-40
liberally.
Now it is time to remove the wheel side
ones. These will need WD-40 also.

21. Remove two 5/16" strap bolts from wheel side of
halfshaft. Use WD-40
liberally.
22. Rotate assembly 180 degrees.
23.
Remove the last two 5/16" strap bolts. Use WD-40
liberally.
24. Pull wheel knuckle away from the car to
drop halfshaft out. You may have to get a screwdriver
or other prying device in between the universal joints and mounting surface to
help pry the halfshaft out as they can be stuck in
place.
Before you
do anything, this may be a good point to take a little extra time to make
reassembly much easier. I took the 5/16" strap bolts that came out of the
halfshaft, mounting straps, and leaf spring bolt and cleaned them up on a
wirewheel on my bench grinder. They were coated with years of surface rust and
they went in like a dream comparitively when I reassembled everything.
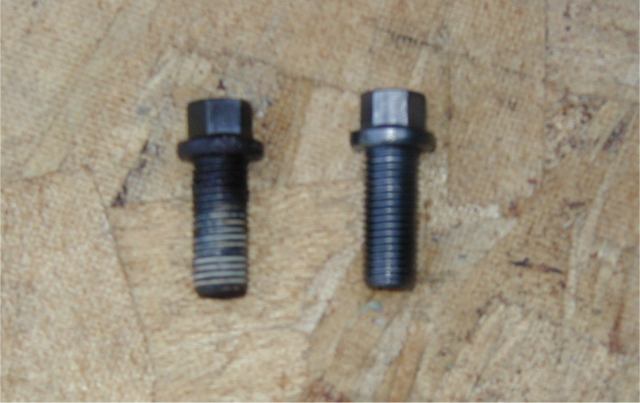
5/16"
Strap Bolts Uncleaned and Cleaned
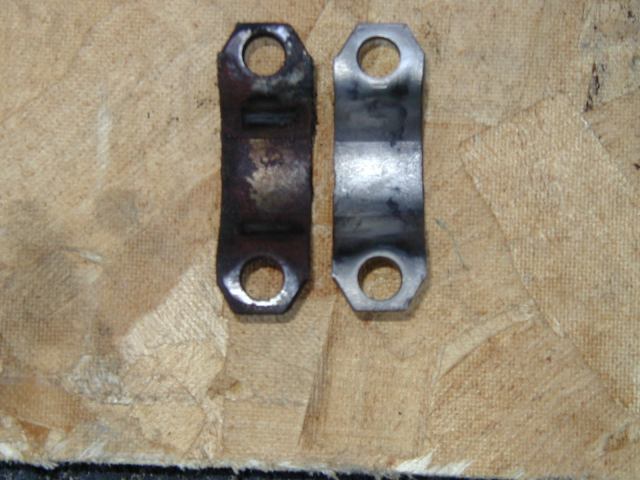
Mounting Straps Outside Uncleaned and
Cleaned.

Mounting Straps Inside Uncleaned and Cleaned.
No picture of leaf spring
bolt.
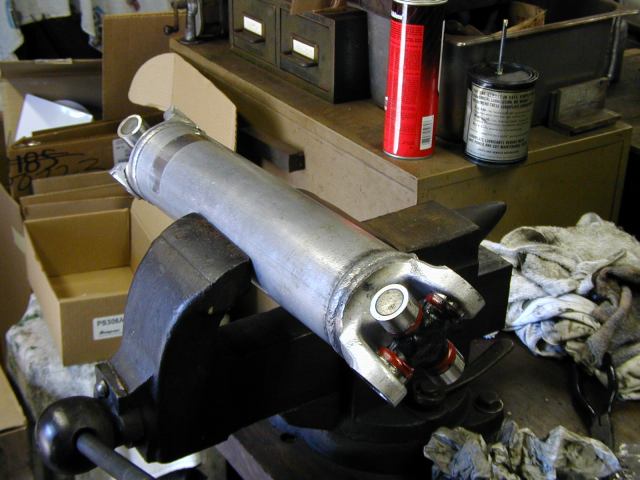
Universal Joint
Removal
Note: At any
point that you have the halfshaft itself in the vice, use very very little
pressure. Use just enough to keep it in place. The halfshaft itself is hollow
aluminum, and you could easily squish it if not careful. I know this sounds too
easy to break, but it is the design. The halfshaft's design is not made to
withstand squeezing pressures from the outside, only twisting forces of which it
is very very strong at doing.
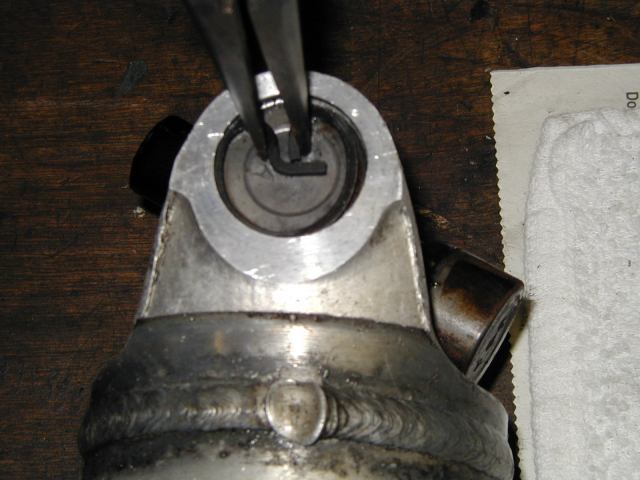
25. Remove the 2 snap-rings
from the halfshaft end you are working on.
Squeeze the two ends as seen
in the picture together, and slide a flathead screwdriver under it and pop it
out.
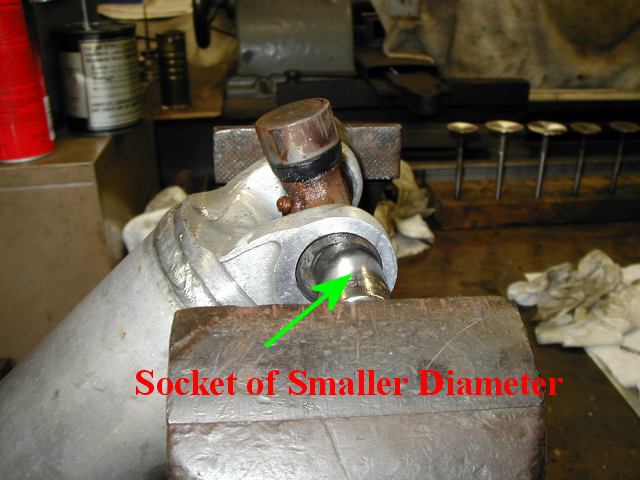
26. Find two sockets. One must be slightly smaller
than the outter diameter of the u-joint (I used 18mm I think), and one slightly
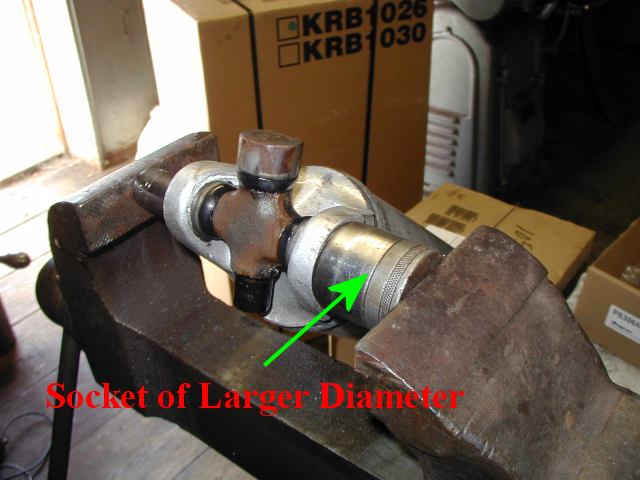
larger than the outter diameter of the u-joint (I think I used 1.5"). See the
picture for what I mean.
Smaller Socket
Larger Socket
27. Setup the u-joint and sockets in a vice as seen
below.
Small socket on the outside of the vice lined up with u-joint,
large socket on the inside of the vice lined up with u-joint.

28. Now press the vice inward which will also press
one end of the u-joint into the large socket.
29. Once the u-joint has been pressed over as far as
possible, remove the setup from the vice and pull off the cap from the large
socket end with your hands.
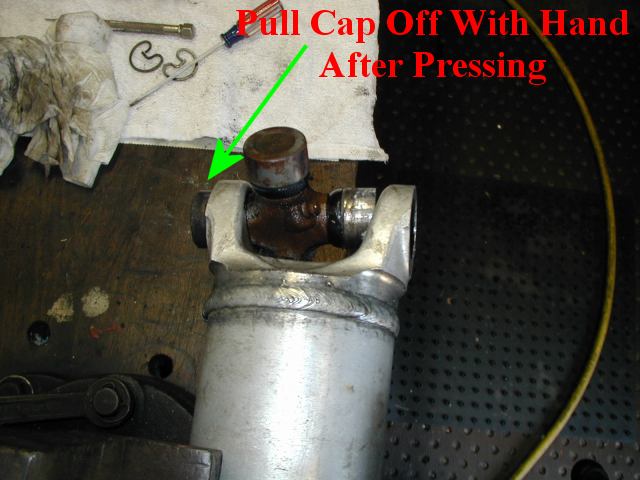
30. You should be able to now pull the rest of the
u-joint out of the halfshaft easily.
At
this point I took the time to clean the halfshaft thouroughly. I cleaned all
grime, gook, and whatever else off of it with a bath in kerosene, and then
clothed it down and hit it with some compressed air to fully dry it. You could
easily use something like brake cleaner, or anything else that you know works
good at breaking down grease.
Universal Joint
Installation
31. Press the halfshaft into the vice. See not
about being gentle above.
33. Lubricate the innerside of the halfshaft loops
with some sort of press libricant.
Coat as seen with lubricant, you don't
need much as excess will just be pressed out anyways. Even something like motor
oil would probably work here.

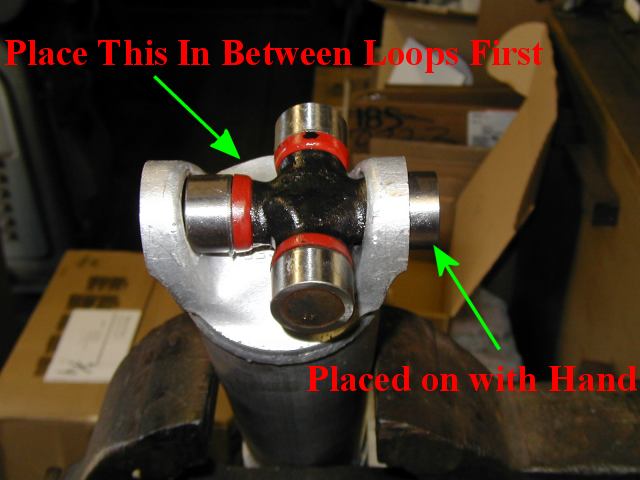
34. Set the new u-joint in place exactly as the old
one was (with one cap off) before you removed it.
35. Install one snapring on
the loop of the halfshaft on the outside of the vice.
36. Place the cap on by
hand and press it on as far as you can gently making sure all is lined
up.
Setup the new u-joint to be installed.
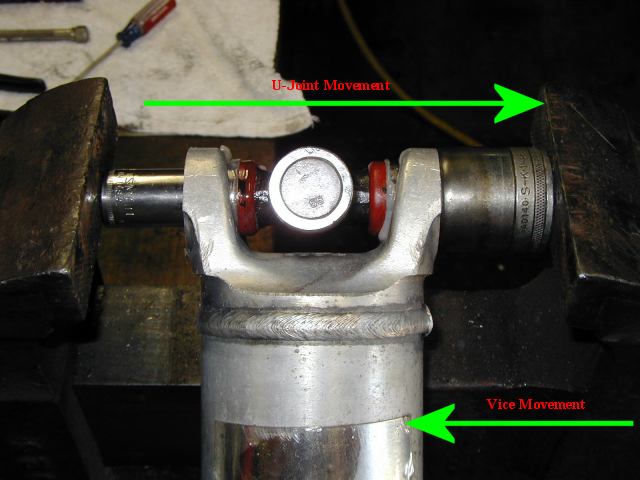
37. Setup the u-joint and sockets in the opposite
manner as when you removed it. Larger socket on the outside loop where the
installed snapring is, and small socket on the inside.
Setup as seen
here, so that when the vice is pressed in, the u-joint will be moved in the
opposite direction pushing it into the halfshaft. In this shot you can see the
white grease from inside the new u-joint that has pressed out during
installation. That is fine.
38. Press the new u-joint in smoothly until you can
feel it come up against the installed snapring. The pressure will increase, this
is how you can tell.
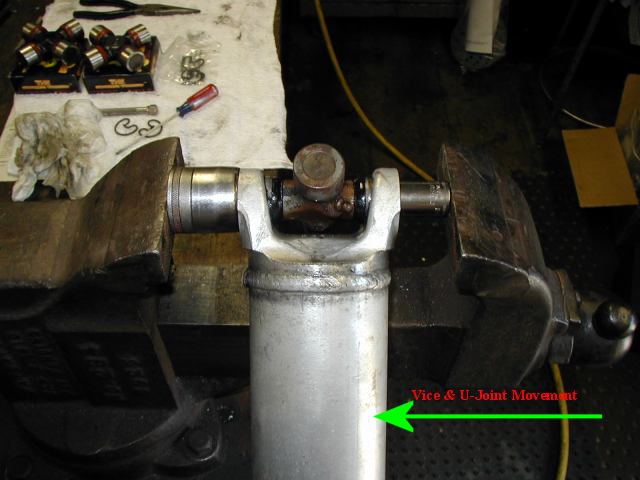
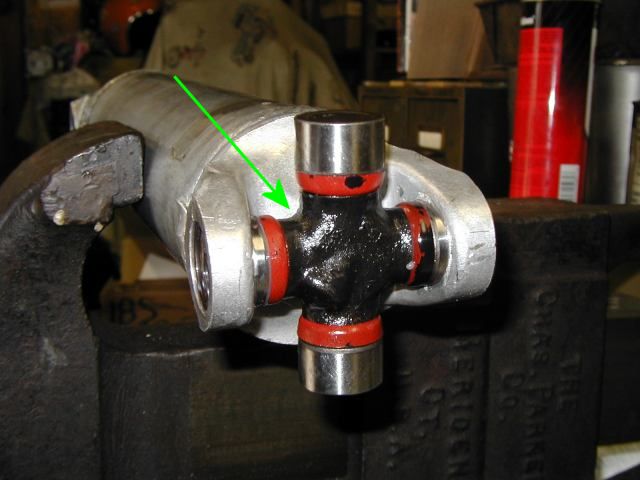
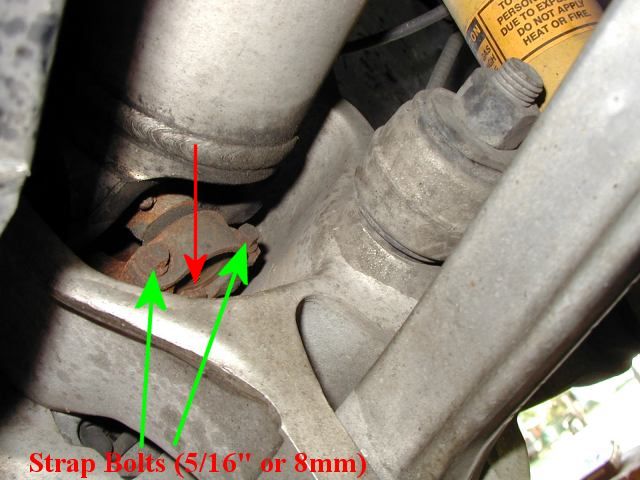
39. Install the snapring on the opposite side
now.
The u-joint may be a little tough to turn as pressing it in loads up
everything to the side that had the large socket on it during install. What I do
is take something like a chisel with a very blunt end on it, and whack it with a
hammer where the green arrow is pointed. You want to whack it
towards the side you put the cap on by hand with. You don't
need much, be very gentle, just a slight tap should work. You should notice that
the u-joint moves much more freely after doing this as the load will be
distributed throughout both sides now evently.
So here is the halfshaft all clean and ready to go
in.
Installation
Installation
is basically the exact same as removal, just in the opposite direction. There
are a few things to consider when reinstalling.
A1. Remember to line up
the Camber Bolt with the score marks when you reinstall it.
A2. Remember to
install the leaf-spring nut so that the same amount of threads are
showing.
A3. Remember to use new cotter-pins where you removed the other
two.
A4. Remember to use some locktite on the 5/16" strap bolts upon
reinstallation.
A5. Remember to make sure the u-joints are on the inside of
the little blocks that hold it in place side to side when it goes back in. They
are hard to see, but can be seen here in this picture at the end of the red
arrow.
All Done
Look any better?
:-)
It might be smart to check the strap bolts after a
couple hundred miles of driving to make sure they are still torqued down nicely.